Broadcom eCos | Writing a device profile for bcm2-utils
In this blog post we’ll dive into jclehner’s bcm2-utils tools and perform the following steps:
- dump an unknown bootloader with bcm2dump
- reverse engineer specific sections of the booloader
- write a device profile for bcm2dump
- dump the NAND flash and extract the eCos firmware
- dump the SPI flash and analyze non-vol settings
From there, we will patch non-vol settings to enable console access, flash it and then adapt the console section of our initial bcm2dump profile.
Information Gathering
The device under test is the Siligence TCG300 from Orange, a white-branded ASKey device. The device sports three 4 pins pinouts labelled UART0, UART1, UART2.
UART0 is live while the others are not.
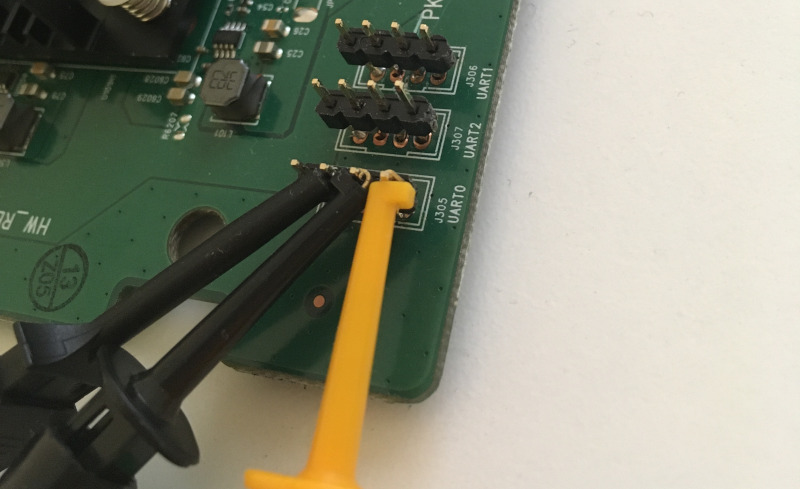
The pins setup for reference:

From early boot information, we see that the device bootloader is unlocked. You can see that from the Enter ‘1’, ‘2’, or ‘p’ prompt, allowing to enter the bootloader menu by pressing ‘p’.
MemSize:            256 M
Chip ID:     BCM3384ZU-B0

BootLoader Version: 2.5.0beta8 Rev2 Release spiboot dual-flash nandflash memsys2g800x16 avs linux ssc
Build Date: May 24 2016
Build Time: 17:01:11
SPI flash ID 0xc22014, size 1MB, block size 64KB, write buffer 256, flags 0x0
StrapBus address b4e00194, value fbff7e77
NAND flash: Device size 128 MB, Block size 128 KB, Page size 2048 B
Cust key size 128

Signature/PID: d22f

Successfully restored flash map from SPI flash!
NandFlashRead: Reading offset 0x2600000, length 0x5c

Image 1 Program Header:
   Signature: d22f
     Control: 0005
   Major Rev: 0100
   Minor Rev: 01ff
  Build Time: 2017/6/30 12:17:00 Z
 File Length: 5258252 bytes
Load Address: 80004000
    Filename: TCG300-D22F.EG00.15.01.OBE.01.05.11-V-E-170630_sto.bin
         HCS: d1d8
         CRC: 35948d51

Found image 1 at offset 2700000
NandFlashRead: Reading offset 0x3600000, length 0x5c

Image 2 Program Header:
   Signature: d22f
     Control: 0005
   Major Rev: 0100
   Minor Rev: 01ff
  Build Time: 2017/6/30 12:17:00 Z
 File Length: 5258252 bytes
Load Address: 80004000
    Filename: TCG300-D22F.EG00.15.01.OBE.01.05.11-V-E-170630_sto.bin
         HCS: d1d8
         CRC: 35948d51

Found image 2 at offset 3700000
NandFlashRead: Reading offset 0x4600000, length 0x5c

Enter '1', '2', or 'p' within 2 seconds or take default...
But even though the bootloader is unlocked, we cannot access the cable modem console given that console input/output has been explicitly disabled in non-volatile storage:
Checksum for dynamic settings:  0x42ccf5dd
Settings were read and verified.

Console input has been disabled in non-vol.
Console output has been disabled in non-vol!  Goodbye...
To read the flash content, we have to instrument the bootloader code by writing a custom profile for bcm2-utils.
Dumping the bootloader
Quoting bcm2-utils documentation:
An easy way to locate the bootloader is to jump to an arbitrary location in RAM, and then study the exception handler’s output. Jumping to a random address is one way to crash your device, but to be safe, you could write an opcode to RAM that will cause a crash, and then jump to that location. Something like sw $zero, 0($zero) (0xac000000) is always a safe bet.
Let’s do exactly that !
w

Write memory.  Hex address: 0x80000000
Hex value: 0xac000000

j

Jump to arbitrary address (hex): 0x80000000

******************** CRASH ********************

EXCEPTION TYPE: 3/TLB (store)
TP0
r00/00 = 00000000 r01/at = 83f90000 r02/v0 = 80000000 r03/v1 = 00000001
r04/a0 = 83f8e3c0 r05/a1 = 00000000 r06/a2 = 80000000 r07/a3 = 00000000
r08/t0 = 00000020 r09/t1 = 00000000 r10/t2 = 00000029 r11/t3 = 0000003a
r12/t4 = 20000000 r13/t5 = 000000a8 r14/t6 = 00000000 r15/t7 = 00000000
r16/s0 = 942100d8 r17/s1 = 00000000 r18/s2 = 1dcd6500 r19/s3 = 0337f980
r20/s4 = 94210084 r21/s5 = 000063d8 r22/s6 = efa9fd7c r23/s7 = 0000fc14
r24/t8 = 00000002 r25/t9 = 00001021 r26/k0 = efa9fd7c r27/k1 = 83f8b16c
r28/gp = 35552b87 r29/sp = 87ffff40 r30/fp = 00000215 r31/ra = 83f86fd0

pc   : 0x80000000               sr  : 0x00000002
cause: 0x0000800c               addr: 0x00000000
The most important info here is the value from register $ra, but we can also see many other references to 0x83f8XXXX, so it’s safe to assume that the bootloader is loaded somewhere around this address.
Restart the device, go into the main menu again, and we can fire up bcm2dump to dump the bootloader code from ram. The bootloader is usually very small, around 64k. To be safe, we’ll dump 128k before and after 0x83f80000:
I consider that you can connect a USB to UART adapter on your Linux box to run this bcm2dump command:
bcm2dump -P generic dump /dev/ttyUSB0 ram 0x83f60000,256k bootloader.binCleaning Things Up
Looking at dumped content, the beginning is mostly 0xff up to offset 0x00020000:
hexdump -C bootloader.bin| head
00000000 ff ff ff ff ff ff ff ff ff ff ff ff ff ff fd ff |................|
00000010 ff ff ff ff ff ff ff ff ff ff ff ff ff ff ff ff |................|
00000020 ff ff ff ff ff ff ff ff bf ff ff ff ff ff ff ff |................|
00000030 ff ff ff ff ff ff ff ff ff ff df ff ff ff ff ff |................|
00000040 ff ff ff ff ff ff ff ff ff 7f ff ff ff ff ff ff |................|
00000050 ff ff ff ff ff ff ff ff ff ff ff ff ff ff ff ff |................|
00000060 ff ff ff ff ff bf ff ff ff ff ff ff ff ff ff ff |................|
00000070 ff ff ff ff ff ff ff ff ff ef ff ff ff ff ff ff |................|
00000080 ff ff ff ff ff ff ff ff ff ff ff ff ff ff ff ff |................|
--snip--
00020000 3c 03 83 f9 8c 63 5f d4 94 62 00 12 30 42 08 00 |<....c_..b..0B..|
00020010 10 40 ff fd 00 00 00 00 94 62 00 16 03 e0 00 08 |.@.......b......|
00020020 30 42 00 ff 30 84 00 ff 3c 05 83 f9 8c a5 5f d4 |0B..0...<....._.|
00020030 00 a0 18 21 94 62 00 12 30 42 00 08 10 40 ff fd |...!.b..0B...@..|
00020040 00 00 00 00 03 e0 00 08 a4 a4 00 16 3c 02 83 f9 |............<...|
00020050 8c 42 5f d4 94 42 00 12 30 42 08 00 03 e0 00 08 |.B_..B..0B......|
00020060 00 02 10 2b 3c 03 83 f9 8c 63 5f d4 94 62 00 12 |...+<....c_..b..|
00020070 30 42 08 00 10 40 00 04 00 00 00 00 94 62 00 16 |0B...@.......b..|
00020080 03 e0 00 08 30 42 00 ff 03 e0 00 08 00 00 10 21 |....0B.........!|
00020090 3c 02 83 f9 8c 42 06 64 14 40 00 34 00 40 18 21 |<....B.d.@.4.@.!|
000200a0 3c 03 b5 0b 8c 63 50 04 30 63 00 01 3c 02 b5 0b |<....cP.0c..<...|
000200b0 8c 42 20 00 30 42 00 07 00 62 18 21 3c 02 02 00 |.B .0B...b.!<...|
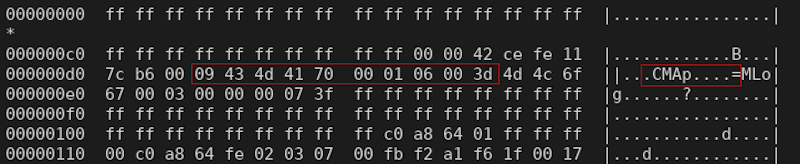
000200c0 00 62 10 04 3c 01 83 f9 ac 22 06 68 3c 02 08 00 |.b..<....".h<...|The data section starts at offset 0000d690 (0x83f8d690):
0000d610  14 40 ff fc 24 63 ff ff  00 e4 80 23 00 d0 18 23  |.@..$c.....#...#|
0000d620  54 60 00 05 90 a2 00 00  0c fe 2f dd 00 a0 20 21  |T`......../... !|
0000d630  10 00 00 11 02 02 10 21  50 40 00 0d a0 e0 00 00  |.......!P@......|
0000d640  24 06 00 01 50 66 00 06  25 08 00 01 91 02 00 00  |$...Pf..%.......|
0000d650  a0 e2 00 00 24 e7 00 01  24 63 ff ff 25 08 00 01  |....$...$c..%...|
0000d660  91 02 00 00 14 40 ff f7  00 00 00 00 a0 e0 00 00  |.....@..........|
0000d670  01 05 10 23 02 02 10 21  8f bf 00 04 8f b0 00 00  |...#...!........|
0000d680  03 e0 00 08 27 bd 00 10  00 00 00 00 00 00 00 00  |....'...........|
0000d690  48 65 61 70 20 65 78 63  65 65 64 65 64 20 31 2f  |Heap exceeded 1/|
0000d6a0  32 20 4d 42 21 0a 00 00  55 6e 72 65 63 6f 67 6e  |2 MB!...Unrecogn|
0000d6b0  69 7a 65 64 20 53 50 49  20 64 65 76 69 63 65 2c  |ized SPI device,|
0000d6c0  20 69 64 3d 25 30 36 78  21 0a 00 00 53 50 49 20  | id=%06x!...SPI |
0000d6d0  66 6c 61 73 68 20 49 44  20 30 78 25 30 36 78 2c  |flash ID 0x%06x,|
Then at offset 0x00016000 we clearly have nothing more:
00015fb0  b4 e0 00 c0 b4 e0 00 00  08 00 00 00 00 00 00 00  |................|
00015fc0  03 37 f9 80 00 01 11 38  00 00 00 00 00 00 09 00  |.7.....8........|
00015fd0  26 01 01 00 b4 e0 05 00  00 00 00 00 00 00 00 00  |&...............|
00015fe0  83 f9 19 c8 83 f0 00 00  00 00 00 00 ff ff ff ff  |................|
00015ff0  ff ff ff ff ef ff ff ff  ff ff ff ff ff ff ff ff  |................|
00016000  ff ff ff ff ff ff ff ff  ff ff ff ff ff ff ff ff  |................|
*
Let’s remove the 0x00020000 (131072 in decimal) first bytes with dd, while stopping at offset 0x00016000 (90112 in decimal). This way we get a clean bootloader image without any garbage data before or after.
dd if=bootloader.bin of=bootloader.clean.bin skip=131072 count=90112 bs=1 status=progressNow that we have a clean bootloader image, it’s time to write our initial profile.
Writing the profile
Base Information
We can start with what we know from the boot logs and initial information gathering:
- the device name
- the firmware image ‘signature’ (psig)
- the baud rate
- the broadcom chipset model
In profiledef.c, you can append the following value:
{
    .name = "TCG300",
    .pretty = "Siligence TCG300-D22F",
    .arch = BCM2_3384,
    .pssig = 0xd22f,
    .baudrate = 115200,
}
Flash Partitions Layout
Now we need to define each memory space layouts (ram, nvram, flash) in the .spaces section. To do so, we print the flash partition by typing ‘p’ in the bootloader menu:
Main Menu:
==========
  b) Boot from flash
  c) Check DRAM
  g) Download and run from RAM
  d) Download and save to flash
  e) Erase flash sector
  m) Set mode
  s) Store bootloader parameters to flash
  i) Re-init ethernet
  r) Read memory
  w) Write memory
  j) Jump to arbitrary address
  p) Print flash partition map
  E) Erase flash region/partition
  X) Erase all of flash except the bootloader
  z) Reset

Flash Partition information:

Name           Offset        Size    Index
==========================================
bootloader  0x00000000   0x00010000   0
permnv      0x00010000   0x00020000   5
dynnv       0x000c0000   0x00040000   7
linuxapps   0x00100000   0x02600000   4
image1      0x02700000   0x01000000   1
image2      0x03700000   0x01000000   2
linux       0x04700000   0x00800000   3
linuxkfs    0x04f00000   0x02000000   8
dhtml       0x06f00000   0x01200000   6
We have 9 partitions but they’re not located in the same chip. bootloader, permnv, and dynnv are located onto the SPI flash (nvram in bcm2utils lingo), while all the others are located onto the NAND flash (flash in bcm2utils lingo). Let’s convert that information into our bcm2utils profile:
{
    .spaces = {
        { .name = "ram" },
        {
            .name = "nvram",
            .size = 0x100000,
            .parts = {
                { "bootloader", 0x00000, 0x10000},
                { "permnv",     0x10000, 0x20000, "perm" }
                { "dynnv",      0xc0000, 0x40000, "dyn" }
            },
        },
        {
            .name = "flash",
            .size = 128 * 1024 * 1024,
            .parts = {
                { "linuxapps", 0x00100000, 0x02600000 },
                { "image1",    0x02700000, 0x01000000 },
                { "image2",    0x03700000, 0x01000000 },
                { "linux",     0x04700000, 0x00800000 },
                { "linuxkfs",  0x04f00000, 0x02000000 }
            }
        },
    },
Profile Auto Detection
bcm2dump supports profile auto-detection. For bcm2dump to be able to auto-identify your device, you need to tell it whether you expect it to launch the detection when in bootloader prompt (BCM2_INTF_BLDR) or console prompt (BCM2_INTF_BFC). You then provide a .magic value. This value is a tuple holding a memory address and expected value. bcm2dump will read the value at the given memory location and check it against the expected value. If they match, the profile is detected.
The .intf definition tells bcm2dump what to look for when connecting to the console.
{
.versions = {
{
.intf = BCM2_INTF_BLDR,
.rwcode = 0x84010000,
.buffer = 0x85f00000
},
{
.version = "2.5.0beta8 Rev2",
.intf = BCM2_INTF_BLDR,
.magic = { 0x83f8f600, "2.5.0beta8 Rev2" },
}
}
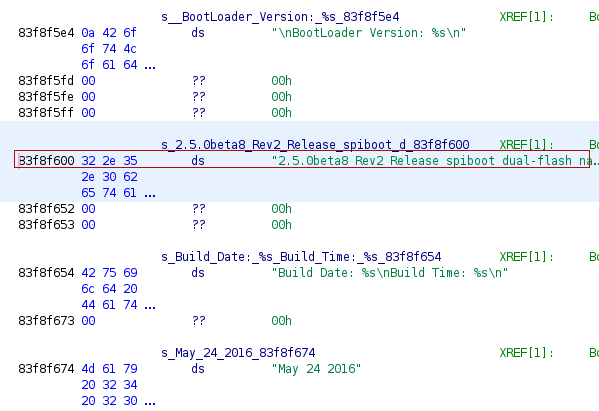
},You have to go through strings in the firmware to find good candidates. Here’s the one I used, displayed in Ghidra:
The rwcode and buffer values are copy/pasted from Compal and NetMASTER profiles. They worked perfectly.
Flash Read Functions Definition
bcm2dump can instrument existing bootloader code for faster dumping of both SPI and NAND flash chips. To get that feature working for our profile, we need to identify the functions in charge of reading from these chips, along with their function signatures.
Let’s see how we can identify these functions.
Loading A Bootloader Image in Ghidra
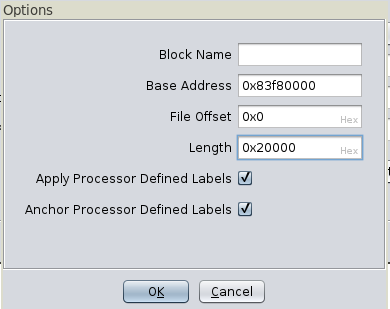
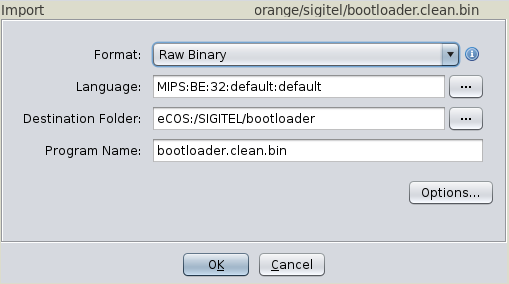
Remember the bootloader we extracted at the beginning ? Now it’s time to load it in Ghidra as a MIPS big endian 32 bits raw binary. The load address is precisely 0x83f80000 (remember that we dumped memory starting from address 0x83f60000 but that we had 0x20000 bytes of garbage).
Note: The architecture and endianness were derived from an open source bootloader for BCM3384 chips that mentions 32-bit MIPS BE in its documentation.
We can identify numerous functions from calls to verbose logging functions.
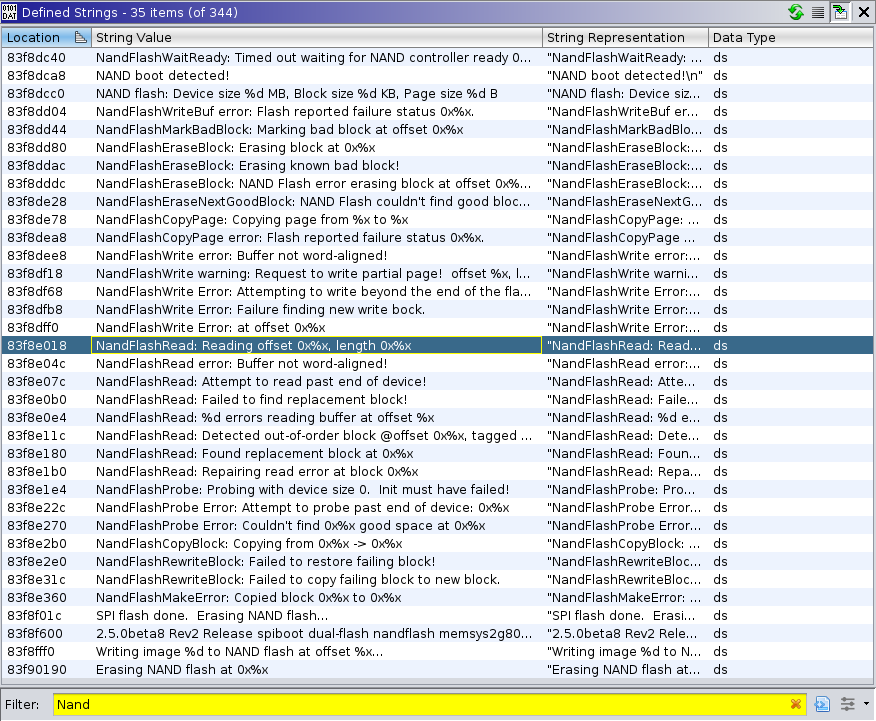
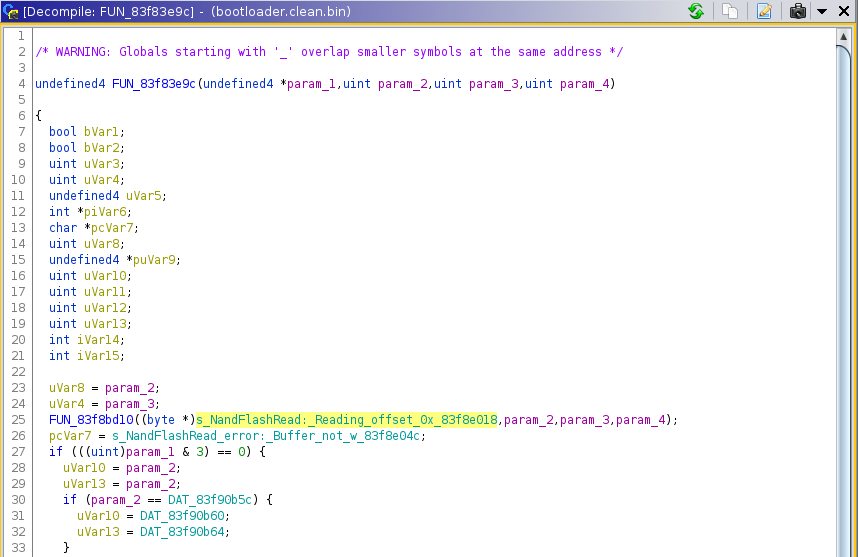
The one we’re interested in is NandFlashRead at offset 0x83f83e9c.
Automating Function Identification
Most bootloaders I analyzed still have verbose logging and we can use that to our advantage. The process is dead simple:
- identify log call
- extract function name from the log call
- rename the function where log function is called with the extracted name
I wrote the script below using radare2/r2pipe but feel free to re-implement it in your language of choice with your favorite SRE tool.
#!/usr/bin/env python3
'''
eCos bootloader analysis script.

Analyze a binary looking for function name logging strings and cross-reference
them to their actual function location.

Useful to identify functions to instrument to interact with SPI or NAND flash
(e.g. NandFlashRead, NandFlashWrite, SpiFlashRead, SpiFlashWrite).

Author: Quentin Kaiser <quentin@ecos.wtf>
'''
import sys
import json
import re
import r2pipe


def analyze(filename, base_addr=0x83f80000, arch='mips', bits=32, big_endian='true'):
    '''
    Load filename with radare2 and performs analysis. Results are printed out
    as tabular data in stdout.

    Args:
        filename(str): bootloader's filename
        base_addr(int): bootloader's load address
        arch(str): bootloader's architecture
        bits(int): bootloader address size
        big_endian(bool): bootloader endianness

    Returns:
        None
    '''
    r2session = r2pipe.open(
        filename,
        flags=[
            '-2',
            '-a', arch,
            '-b', '{}'.format(bits),
            '-m', '0x{0:02x}'.format(base_addr),
            '-e', 'cfg.bigendian={}'.format(big_endian)
        ]
    )

    print("[+] Binary loaded. Launching analysis.")
    r2session.cmd("aaaa")
    print("[+] Looking through strings ...")
    raw_data = r2session.cmd("izzj")

    # first we get all strings from the binary and identify function
    # names with our regular expression pattern
    func_names = set()
    for line in json.loads(raw_data):
        if re.match(r"[A-Z][A-z]{8,30}:", line['string']):
            func_name = line['string'].split(':')[0]
            func_names.add(func_name)

        if re.match(r"[A-Z][A-z]{8,30} [E|e]rror:", line['string']):
            func_name = line['string'].split(' ')[0]
            func_names.add(func_name)

    print("[+] {} potential function names identified".format(len(func_names)))
    # for each function name, we identify its location in the binary
    # and xref it to the function where it is mentioned. We then
    # rename the function
    print("{0:40s}{1:20s}{2:20s}".format("Identified function", "Name", "Offset"))
    print("-"*80)
    for func_name in sorted(func_names):
        func_name_refs = json.loads(r2session.cmd("/j {}".format(func_name)))
        for func_name_ref in func_name_refs:
            func_xrefs = json.loads(r2session.cmd("axtj 0x{0:02x}".format(func_name_ref["offset"])))
            if func_xrefs:
                print("{0:40s}{1:20s}(0x{2:02X})".format(
                    func_name, func_xrefs[0]["fcn_name"], func_xrefs[0]['fcn_addr']))
                r2session.cmd("afn {} {}".format(func_name, func_xrefs[0]["fcn_name"]))
                break

if __name__ == "__main__":
    if len(sys.argv) < 2:
        print("Usage: {} bootloader".format(sys.argv[0]))
        sys.exit(-1)
    analyze(sys.argv[1])
Running the script on the Siligence bootloader will give you something along these lines:
./ecos_bootloader_analysis.py bootloader.clean.bin
[+] Binary loaded. Launching analysis.
[+] Looking through strings ...
[+] 28 potential function names identified
Identified function                     Name                Offset
--------------------------------------------------------------------------------
ETHrxData                               fcn.83f85cd0        (0x83F85CD0)
ETHtxData                               fcn.83f85dc8        (0x83F85DC8)
NandFlashCopyBlock                      fcn.83f841f0        (0x83F841F0)
NandFlashCopyPage                       fcn.83f839f8        (0x83F839F8)
NandFlashEraseBlock                     fcn.83f83830        (0x83F83830)
NandFlashEraseNextGoodBlock             fcn.83f8395c        (0x83F8395C)
NandFlashMarkBadBlock                   fcn.83f836e8        (0x83F836E8)
NandFlashRead                           fcn.83f83e9c        (0x83F83E9C)
NandFlashRewriteBlock                   fcn.83f842ec        (0x83F842EC)
NandFlashWaitReady                      fcn.83f83164        (0x83F83164)
NandFlashWrite                          fcn.83f834fc        (0x83F834FC)
PinMuxGet                               fcn.83f84ca0        (0x83F84CA0)
PinMuxSel                               fcn.83f84c20        (0x83F84C20)
PmcCommandIf                            fcn.83f8485c        (0x83F8485C)
PowerDeviceOff                          fcn.83f845c4        (0x83F845C4)
PowerDeviceOn                           fcn.83f84680        (0x83F84680)
ReadBPCMReg                             fcn.83f844cc        (0x83F844CC)
SpiFlashCmdAddr                         fcn.83f81038        (0x83F81038)
SpiFlashWrite                           fcn.83f81148        (0x83F81148)
SwitchReadInt                           fcn.83f82ca4        (0x83F82CA4)
TransmitBurst                           fcn.83f86158        (0x83F86158)
ValidateFlashMap                        fcn.83f82028        (0x83F82028)
WriteBPCMReg                            fcn.83f843f0        (0x83F843F0)
Writing Profile
Thanks to the information gained with the script, I was able to create the profile section below. I specified a read function for the NAND flash at address 0x83f83e9c and that this function signature is buffer, offset, length (BCM2_READ_FUNC_BOL, BOL means Buffer Offset Length). I also specified a read function for the SPI flash located at address 0x83f81324, with an offset, buffer, length signature (BCM2_READ_FUNC_OBL).
.versions = {
    {
	    .intf = BCM2_INTF_BLDR,
		.rwcode = 0x84010000,
		.buffer = 0x85f00000
	},
	{
		.version = "2.5.0beta8 Rev2",
		.intf = BCM2_INTF_BLDR,
		.magic = { 0x83f8f600, "2.5.0beta8 Rev2" },
		.printf = 0x83f8bd10,
		.spaces = {
			{
				.name = "flash",
				.read = {
					.addr = 0x83f83e9c,
					.mode = BCM2_READ_FUNC_BOL,
					},
			},
            {
                .name = "nvram",
                .read = {
                    .addr = 0x83f81324,
                    .mode = BCM2_READ_FUNC_OBL,
                },
            }
        }
    }
}
Validating Profile
Once that’s done, compile the new profile and run the tool to see if the device is detected:
./bcm2dump -v info /dev/ttyUSB0,115200
detected profile TCG300(bootloader), version 2.5.0beta8
TCG300: Siligence TCG300-D22F
=============================
pssig         0xd22f
blsig         0x0000

ram           0x00000000                            RW
------------------------------------------------------
(no partitions defined)

nvram         0x00000000 - 0x000fffff  (     1 MB)  RO
------------------------------------------------------
bootloader    0x00000000 - 0x0000ffff  (    64 KB)
permnv        0x00010000 - 0x0002ffff  (   128 KB)
dynnv         0x000c0000 - 0x000fffff  (   256 KB)

flash         0x00000000 - 0x07ffffff  (   128 MB)  RO
------------------------------------------------------
linuxapps     0x00100000 - 0x026fffff  (    38 MB)
image1        0x02700000 - 0x036fffff  (    16 MB)
image2        0x03700000 - 0x046fffff  (    16 MB)
linux         0x04700000 - 0x04efffff  (     8 MB)
linuxkfs      0x04f00000 - 0x06efffff  (    32 MB)
Dumping NAND
If that works, we’re ready to dump the NAND content. First bcm2dump will patch the code in memory and then trigger calls to dump the flash over serial:
./bcm2dump -v dump /dev/ttyUSB0,115200 flash image1 image1.bin
 detected profile TCG300(bootloader), version 2.5.0beta8
 updating code at 0x84010000 (436 b)
  100.00% (0x840101b3)               6  bytes/s (ELT      00:01:11)
 dumping flash:0x02700000-0x036fffff (16777216 b)
  100.00% (0x036fffff)            7.10k bytes/s (ELT      00:38:28)
Dumping SPI Flash
Dumping dynnv
Dumping dynamic settings is also super easy:
./bcm2dump -v dump /dev/ttyUSB0,115200 nvram dynnv dynnv.binWe can read it using bcm2cfg:
./bcm2cfg info dynnv.bin
failed to parse group firewall
dynnv.bin
type    : dyn
profile : (unknown)
checksum: 3e08f5dd (ok)
size    : 28084 (ok)

434d4170  CMAp  0.2     bfc              16 b
4d4c6f67  MLog  0.5     userif           82 b
f2a1f61f  ....  0.2     halif            11 b
--snip--
Bypassing a Disabled Console Prompt
If you remember the boot logs, we cannot access the device console because it’s been explicitly disabled in the non-vol settings:
Checksum for dynamic settings:  0x42ccf5dd
Settings were read and verified.

Console input has been disabled in non-vol.
Console output has been disabled in non-vol!  Goodbye...
I explored three avenues when trying to bypass this protection:
- Patching the firmware code
- Patching the permnv settings
- Patching the dynnv settings
Patching Firmware Code
The initial idea was to patch the firmware image to bypass the console enable checks. The check is performed at 0x80166508 and we should replace it with an unconditional jump.
LAB_80166500                                    XREF[1]:     80166404(j)
        80166500 0c 05 6c a1     jal        FUN_8015b284                                     int FUN_8015b284(undefined4 para
        80166504 00 00 00 00     _nop
        80166508 10 40 00 23     beq        v0,zero,LAB_80166598
        8016650c 00 40 80 21     _move      s0,v0
        80166510 8c 43 00 48     lw         v1,0x48(v0)
We can see the beq v0,zero instruction below (10 40 00 23):
hexdump -C TCG300-D22F.modified.out| grep 00162500
00162500  0c 05 6c a1 00 00 00 00  10 40 00 23 00 40 80 21  |..l......@.#.@.!|
We patch it with an unconditional jump:
rasm2 -a mips -b 32 -e -d '10 40 00 23'
beqz v0, 0x90
rasm2 -a mips -b 32 -e -d '10 00 00 23'
b 0x90
$ python3 patcher.py TCG300-D22F.modified.out
Opening TCG300-D22F.modified.out
10400023
Patching instruction at offset 1451272
$ hexdump -C TCG300-D22F.modified.out| grep 00162500
00162500 0c 05 6c a1 00 00 00 00 10 00 00 23 00 40 80 21 |..l........#.@.!|Once it is patched, we repack it by reproducing the image format:
./ProgramStore -f TCG300-D22F.out -c 1 -v 0100.01ff -t 1498825020 -s 0xd22f -a 0x80004000 -o TCG300-D22F.EG00.15.01.OBE.01.05.11-V-E-170630_modified.binWe can serve the firmware over TFTP:
sudo iptables -t nat -A PREROUTING -p udp -d 192.168.100.10 --dport 69 -s 192.168.100.1 -j REDIRECT --to-ports 6969
ptftpd -v -p 6969 eno1 `pwd`
Press ‘g’ menu in bootloader to load the image and execute from RAM. The image loads and get decompressed but then we have a crash for some unknown reason.
I didn’t go further this path.
Edit: I recently found a way to properly patch firmware files, the methods detailed in Gaining Persistence with Firmware Implant should work for the bypass described above.
Patching permnv
Let’s extract the permnv partition:
./bcm2dump -v dump /dev/ttyUSB0,115200 nvram permnv permnv.binLet’s parse it with bcm2cfg:
./bcm2cfg info permnv.bin
failed to parse group bfc
failed to parse group userif
failed to parse group bcmwifi
failed to parse group bcmwifi2
failed to parse group cmlog
failed to parse group rstl
failed to parse group cmbl
failed to parse group dhcp
failed to parse group csp
failed to parse group firewall
failed to parse group guestwifi
failed to parse group guestwifi2
/tmp/tcg3000.permnv.spi
type    : dyn
profile : (unknown)
checksum: fe117cb6 (ok)
size    : 17102 (ok)
checksum and size are okay, but sections are not parsed correctly. The bfc section that we need to modify is empty:
./bcm2cfg get /tmp/tcg3000.permnv.spi
failed to parse group bfc
failed to parse group userif
failed to parse group bcmwifi
failed to parse group bcmwifi2
failed to parse group cmlog
failed to parse group rstl
failed to parse group cmbl
failed to parse group dhcp
failed to parse group csp
failed to parse group firewall
failed to parse group guestwifi
failed to parse group guestwifi2
{
  bfc = {
  }
--snip--
I’m considering you know the format of permnv/dynnv in Broadcom based devices. For a primer on such format, see https://github.com/jclehner/bcm2-utils/blob/master/FORMAT.md.
If we look at raw data from the permnv, we see that the data is all wrong. The length of the bfc section is supposed to be 0x09 bytes, but if it is, it is overlapping with the length (0x3d) of the next section (MLog).
Compared to a valid format taken from dynnv:

Given the weird format, it is highly unlikely the firmware reads data off permanent non-vol storage to check if console access is enabled or not. Most likely this data is used as a skeleton to rebuild the dynamic storage section during factory reset. Moving on.
Patching dynnv
First, let’s dump dynnv from the SPI flash using bcm2-utils:
./bcm2dump -F -v dump /dev/ttyUSB0,115200 nvram dynnv dynnv.binWe can see that serial_console_mode is set to disabled:
./bcm2cfg get dynnv.bin | more
{
  bfc = {
    serial_console_mode = disabled
  }
Let’s rewrite it:
./bcm2cfg set dynnv.bin bfc.serial_console_mode 2 dynnv.modified.bin
bfc.serial_console_mode = rw
Now that we have a modified dynnv partition, it’s time to write it back to the device. The problem here is that bcm2dump does not support (yet) writing back to nvram or flash from the bootloader menu. I filed an issue and will most likely work on it in the near future.
Edit: It turns out I was wrong and bcm2dump does support writing back to nvram. I was just missing the right flags. I’ll edit this at some point in the future, writing back using SPI protocol worked well anyway :)
In the meantime, I simply plugged into the SPI flash with an 8-pin SOIC clip. The chip is a Macronix MX25L8006E, with the following pinout:

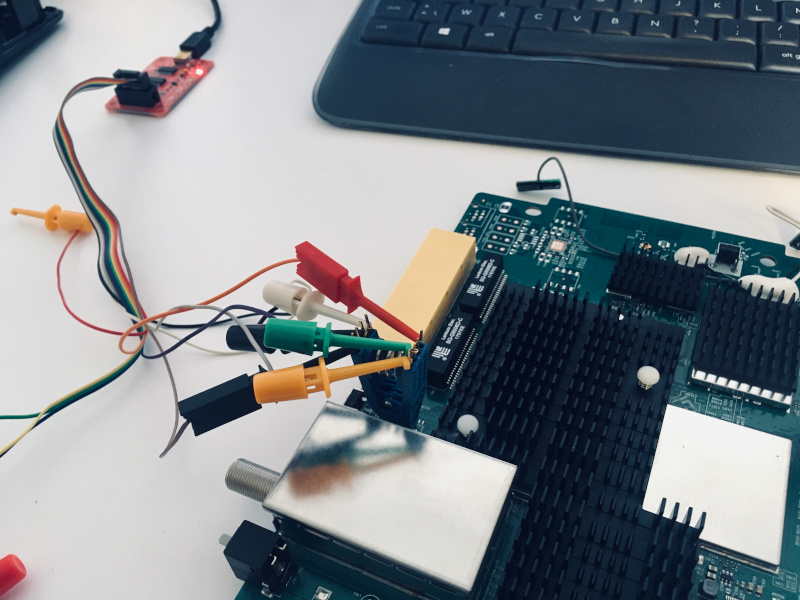
We read the content from the SPI flash with flashrom:
flashrom -p buspirate_spi:dev=/dev/ttyUSB0,spispeed=1M -r /tmp/test.bin
flashrom v1.2 on Linux 5.4.0-48-generic (x86_64)
flashrom is free software, get the source code at https://flashrom.org

Using clock_gettime for delay loops (clk_id: 1, resolution: 1ns).
Found Macronix flash chip "MX25L8005/MX25L8006E/MX25L8008E/MX25V8005" (1024 kB, SPI) on buspirate_spi.
Reading flash... done.
The format is exactly the one from the map, so we can rebuild a modified version
#!/bin/sh

# bootloader  0x00000000   0x00010000   0
# permnv      0x00010000   0x00020000   5
# dynnv       0x000c0000   0x00040000   7

echo "[+] Extracting bootloader"
dd if=/tmp/tcg3000.spi of=/tmp/tcg3000.bootloader.spi count=65536 bs=1 status=progress

echo "[+] Extracting permnv"
dd if=/tmp/tcg3000.spi of=/tmp/tcg3000.permnv.spi skip=65536 count=131072 bs=1 status=progress

echo "[+] Extracting something"
dd if=/tmp/tcg3000.spi of=/tmp/tcg3000.something.spi skip=196608 count=589824 bs=1 status=progress

echo "[+] Extracting dynnv"
dd if=/tmp/tcg3000.spi of=/tmp/tcg3000.dynnv.spi skip=786432 count=262144 bs=1 status=progress

echo "[+] Modifying console settings"
./bcm2cfg set /tmp/tcg3000.dynnv.spi bfc.serial_console_mode 2 /tmp/tcg3000.dynnv.modified.spi

echo "[+] Reconstructing SPI image (modified)"
cat /tmp/tcg3000.bootloader.spi /tmp/tcg3000.permnv.spi /tmp/tcg3000.something.spi /tmp/tcg3000.dynnv.modified.spi > /tmp/tcg3000.modified.spi

ls -al /tmp/tcg3000.spi /tmp/tcg3000.modified.spi
We then write it back:
flashrom -p buspirate_spi:dev=/dev/ttyUSB0,spispeed=1M -w /tmp/tcg3000.modified.spi
flashrom v1.2 on Linux 5.4.0-48-generic (x86_64)
flashrom is free software, get the source code at https://flashrom.org

Using clock_gettime for delay loops (clk_id: 1, resolution: 1ns).
Found Macronix flash chip "MX25L8005/MX25L8006E/MX25L8008E/MX25V8005" (1024 kB, SPI) on buspirate_spi.
Reading old flash chip contents... done.
Erasing and writing flash chip... Erase/write done.
Verifying flash... VERIFIED.
The first attempt failed:
Reading Permanent settings from non-vol...
Checksum for permanent settings:  0xfe117cb6
Setting downstream calibration signature to '5.7.1mp2|die temperature:46.304degC|ext die temperature:77.900degC'
Setting downstream calibration signature to '5.7.1mp2|die temperature:47.970degC|ext die temperature:81.300degC'
Setting downstream calibration signature to '5.7.1mp2|die temperature:50.748degC|ext die temperature:83.500degC'
Settings were read and verified.


Reading Dynamic settings from non-vol...
[00:00:00 01/01/1970] [Reset/Standby Switch Thread] BcmResetStandbySwitchThread::ProcessResetSwitchEvent:  (Reset/Standby Switch Thread) Reset switch released; resetting...
[00:00:00 01/01/1970] [Reset/Standby Switch Thread] BcmResetStandbySwitchThread::ProcessResetSwitchEvent:  (Reset/Standby Switch Thread) Cant Reset pfCmDocsisCtlThread==NULL...
Checksum for dynamic settings:  0x3a23f5dd
Settings were read and verified.

Console input has been disabled in non-vol.
Console output has been disabled in non-vol!  Goodbye...
Reading https://stdw.github.io/cm-sdr/, they indicate that the configuration is repeated multiple times.
Closer examination of the flash image shows that there are a number of repeated copies of the configuration following the initial one.
Let’s take a look by grepping for the bfc configuration section’s magic (“CMAp”):
hexdump -C /tmp/tcg3000.dynnv.modified.spi| grep -C2 CMAp
*
000000c0  ff ff ff ff ff ff ff ff  ff ff 00 00 6d b4 cc 10  |............m...|
000000d0  5b c3 00 10 43 4d 41 70  00 02 00 00 00 02 00 00  |[...CMAp........|
000000e0  00 01 00 52 4d 4c 6f 67  00 05 00 00 00 05 41 53  |...RMLog......AS|
000000f0  4b 45 59 00 03 4d 53 4f  00 08 70 40 73 24 77 30  |KEY..MSO..p@s$w0|
--
00006e80  ff ff ff ff ff ff ff ff  ff ff ff ff ff ff ff ff  |................|
*
00007290  00 00 6d c1 ad 18 50 59  00 10 43 4d 41 70 00 02  |..m...PY..CMAp..|
000072a0  00 00 00 00 00 00 00 01  00 52 4d 4c 6f 67 00 05  |.........RMLog..|
000072b0  00 00 00 05 41 53 4b 45  59 00 03 4d 53 4f 00 08  |....ASKEY..MSO..|
--
*
0000e450  ff ff ff ff ff ff 00 00  6d b4 3b 23 f5 dd 00 10  |........m.;#....|
0000e460  43 4d 41 70 00 02 00 00  00 00 00 00 00 01 00 52  |CMAp...........R|
0000e470  4d 4c 6f 67 00 05 00 00  00 05 41 53 4b 45 59 00  |MLog......ASKEY.|
0000e480  03 4d 53 4f 00 08 70 40  73 24 77 30 72 64 00 74  |.MSO..p@s$w0rd.t|
--
*
00015610  ff ff ff ff ff ff ff ff  ff ff ff ff 00 00 6d b4  |..............m.|
00015620  3a 23 f5 dd 00 10 43 4d  41 70 00 02 00 00 00 00  |:#....CMAp......|
00015630  00 00 00 01 00 52 4d 4c  6f 67 00 05 00 00 00 05  |.....RMLog......|
00015640  41 53 4b 45 59 00 03 4d  53 4f 00 08 70 40 73 24  |ASKEY..MSO..p@s$|
Right, so we have multiple copies and only the first one got modified by bcm2cfg.
I - like a dumbass - initially patched the values manually without taking care of the CRC of each dynnv copy. Which ended up in multiple reflashing, reboots, and overall confusion.
This is the kind of greeting you get when CRC is wrong:
*
*
* Failed to read non-vol settings from the device!
*
*
Console input has been disabled in non-vol.
Console output has been disabled in non-vol!  Goodbye...
A smarter approach is to search for dynnv magic header (‘\xff’ repeated 202 times):
#!/usr/bin/env python
import re
import mmap
import sys

magic = '\xff' * 202
pattern = magic + '\x00\x00\x6d\xb4'

fh = open(sys.argv[1], "r+b")
mf = mmap.mmap(fh.fileno(), 0)
mf.seek(0)
fh.seek(0)
for occurence in re.finditer(pattern, mf):
    print(occurence.start())
mf.close()
fh.close()
The script identifed three different copies of dynnv within the dynnv partition:
./matcher.py /tmp/tcg3000.dynnv.spi
0
58252
87378
From that, we will cut the dynnv in separate sections and edit each of them with bcm2cfg:
#!/bin/sh

# bootloader  0x00000000   0x00010000   0
# permnv      0x00010000   0x00020000   5
# dynnv       0x000c0000   0x00040000   7

echo "[+] Extracting bootloader"
dd if=/tmp/tcg3000.spi of=/tmp/tcg3000.bootloader.spi count=65536 bs=1 status=progress

echo "[+] Extracting permnv"
dd if=/tmp/tcg3000.spi of=/tmp/tcg3000.permnv.spi skip=65536 count=131072 bs=1 status=progress

echo "[+] Extracting something"
dd if=/tmp/tcg3000.spi of=/tmp/tcg3000.something.spi skip=196608 count=589824 bs=1 status=progress

echo "[+] Extracting dynnv"
dd if=/tmp/tcg3000.spi of=/tmp/tcg3000.dynnv.spi skip=786432 count=262144 bs=1 status=progress

echo "[+] Separating dynnv repetitions (ffs)"

# Values taken from our matcher script
# ./matcher.py /tmp/tcg3000.dynnv.spi
# 0
# 58252
# 87378
dd if=/tmp/tcg3000.dynnv.spi of=/tmp/tcg3000.dynnv.part1.spi count=58252 bs=1 status=progress
dd if=/tmp/tcg3000.dynnv.spi of=/tmp/tcg3000.dynnv.part2.spi skip=58252 count=29126 bs=1 status=progress
dd if=/tmp/tcg3000.dynnv.spi of=/tmp/tcg3000.dynnv.part3.spi skip=87378 bs=1 status=progress

echo "[+] Modifying console settings"
./bcm2cfg set /tmp/tcg3000.dynnv.part1.spi bfc.serial_console_mode 2 /tmp/tcg3000.dynnv.part1.modified.spi
./bcm2cfg set /tmp/tcg3000.dynnv.part2.spi bfc.serial_console_mode 2 /tmp/tcg3000.dynnv.part2.modified.spi
./bcm2cfg set /tmp/tcg3000.dynnv.part3.spi bfc.serial_console_mode 2 /tmp/tcg3000.dynnv.part3.modified.spi

./bcm2cfg info /tmp/tcg3000.dynnv.part1.modified.spi | head -n 4
./bcm2cfg info /tmp/tcg3000.dynnv.part2.modified.spi | head -n 4
./bcm2cfg info /tmp/tcg3000.dynnv.part3.modified.spi | head -n 4

echo "[+] Merging dynnvs"
cat /tmp/tcg3000.dynnv.part1.modified.spi /tmp/tcg3000.dynnv.part2.modified.spi /tmp/tcg3000.dynnv.part3.modified.spi > /tmp/tcg3000.dynnv.modified.spi

echo "[+] Reconstructing SPI image (modified)"
cat /tmp/tcg3000.bootloader.spi /tmp/tcg3000.permnv.spi /tmp/tcg3000.something.spi /tmp/tcg3000.dynnv.modified.spi > /tmp/tcg3000.modified.spi

ls -al /tmp/tcg3000.spi /tmp/tcg3000.modified.spi
We re-flash the SPI with /tmp/tcg3000.modified.spi, reboot the device. And now we have a working shell !
CM> dir

!               ?               REM             call            cd
dir             find_command    help            history         instances
ls              man             pwd             sleep           syntax
system_time     usage
----
con_high        cpuLoad         cpuUtilization  exit            mbufShow
memShow         mutex_debug     ping            read_memory     reset
routeShow       run_app         shell           socket_debug    stackShow
taskDelete      taskInfo        taskPrioritySet taskResume      taskShow
taskSuspend     taskSuspendAll  taskTrace       usfsShow        version
write_memory    zone
----
[CmRgMsgPipe] [Console] [HeapManager] [HostDqm] [avs] [cm_hal] [docsis_ctl]
[dtp] [embedded_target] [event_log] [fam] [flash] [forwarder] [ftpLite]
[ip_hal] [itc_hal] [msgLog] [non-vol] [pingHelper] [power] [snmp] [snoop]
[spectrum_analyzer]Edit: the matcher script has to be edited for your own needs/device. After a factory reset of the TCG300, the structure was different and held 10 copies of dynamic settings, each exactly 23830 bytes long.
Expanding the Profile (CM console)
As a final touch, let’s expand our profile to add auto-detection for our device when it’s at the console prompt.
First, we need to pull the firmware image.
./bcm2dump -v dump /dev/ttyUSB0,115200 flash image1 TCG300-D22F.EG00.15.01.OBE.01.05.11-V-E-170630_sto.binThen we can extract it using ProgramStore. To do so, you’ll need to compile ProgramStore from Broacom aeolus repository. Then simply run it in extraction mode:
./ProgramStore -x -f TCG300-D22F.EG00.15.01.OBE.01.05.11-V-E-170630_sto.bin
No output file name specified.  Using TCG300-D22F.out.
   Signature: d22f
     Control: 0005
   Major Rev: 0100
   Minor Rev: 01ff
  Build Time: 2017/6/30 12:17:00 Z
 File Length: 5258252 bytes
Load Address: 80004000
    Filename: TCG300-D22F.EG00.15.01.OBE.01.05.11-V-E-170630_sto.bin
         HCS: d1d8
         CRC: 35948d51

Performing CRC on Image...
Detected LZMA compressed image... decompressing...

Decompressed length unknown.  Padded to 100663296 bytes.
Then you can load it in Ghidra as a raw MIPSBE 32bits binary with load address 0x80004000.
Ideally, you should look for a string that’s printed when running the ‘version’ command. In this case, we’ll look for the revision value (‘5.7.1mp2’).
CM> version
Broadcom Corporation Reference Design

 +------------------------------------------------------------------------------------------------+
 |       _/_/     _/_/_/_/    _/_/                                                                |
 |      _/  _/   _/        _/    _/   Broadband                                                   |
 |     _/  _/   _/        _/                                                                      |
 |    _/_/     _/_/_/    _/           Foundation                                                  |
 |   _/  _/   _/        _/                                                                        |
 |  _/   _/  _/        _/    _/       Classes                                                     |
 | _/_/_/   _/          _/_/                                                                      |
 |                                                                                                |
 | Copyright (c) 1999 - 2017 Broadcom Corporation                                                 |
 |                                                                                                |
 | Revision:  5.7.1mp2                                                                            |
 |
Looks like it’s stored at offset 0x80f62b18:

The version definition is similar to the one I wrote for the bootloader interface:
{
    .version = "5.7.1mp2",
    .intf = BCM2_INTF_BFC,
    .magic = { 0x80f62b18, "5.7.1mp2" },
}
The device is now auto-detected in console mode and you can also dump memory from console mode (although way slower than in bootloader mode):
./bcm2dump -v dump /dev/ttyUSB0,115200 flash image1 /tmp/test.bin
detected profile TCG300(bfc), version 5.7.1mp2
dumping flash:0x02700000-0x036fffff (16777216 b)
   0.02% (0x02701000)   3.19k|  1.92k bytes/s (ETA      02:22:03)  TCG300-D22F.EG00.15.01.OBE.01.05.11-V-E-170630_s (0xd22f, 5258252 b)
Fuzzing
At this point I started fuzzing the device’s web interface and noticed the following output:
CM/NonVol> Received RG Event 0x80000001 State 0x5
RG processor has crashed!
After that, the device fully rebooted. This is strange behavior because eCos devices tends to print out a stack trace with a list of running threads, register values, and memory dump when a crash happen.
We are logged into the ‘Cable Modem’ shell (CM) but could it be that the device also expose a ‘Router Gateway’ (RG) shell ? I switched my connections from UART0 to UART2 and there it was !
RG> help

 !               ?               REM             call            cd
 dir             find_command    help            history         instances
 ls              man             pwd             sleep           syntax
 system_time     usage
 ----
 btcp            con_high        cpuLoad         cpuUtilization  exit
 mbufShow        memShow         mutex_debug     ping            read_memory
 reset           routeShow       run_app         shell           socket_debug
 stackShow       taskDelete      taskInfo        taskPrioritySet taskResume
 taskShow        taskSuspend     taskSuspendAll  taskTrace       version
 write_memory    zone
 ----
 [80211_hal] [Console] [HeapManager] [HostDqm] [cablemedea] [eRouter]
 [embedded_target] [enet_hal] [fam] [forwarder] [ftpLite] [httpClient]
 [ip_hal] [itc_hal] [msgLog] [non-vol] [pingHelper] [power] [snmp] [snoop]
 [tr69]
Different, but similar. The fact that a single eCos kernel run specific code within a specific CPU core is super interesting, but I won’t cover this right now.
Conclusion
Over the course of this article, I explained how to approach an unknown device running Broadcom eCos, dump its bootloader, instrument it to dump the full NAND and SPI flash, patch non-volatile settings to obtain console access, and discovered a second console access.
If you have any questions, feel free to get in touch via email or Twitter.
References
- bcm2utils - https://github.com/jclehner/bcm2-utils
- “Reverse engineering my cable modem and turning it into an SDR” - https://stdw.github.io/cm-sdr/
Tagged #ecos, #bootloader.